

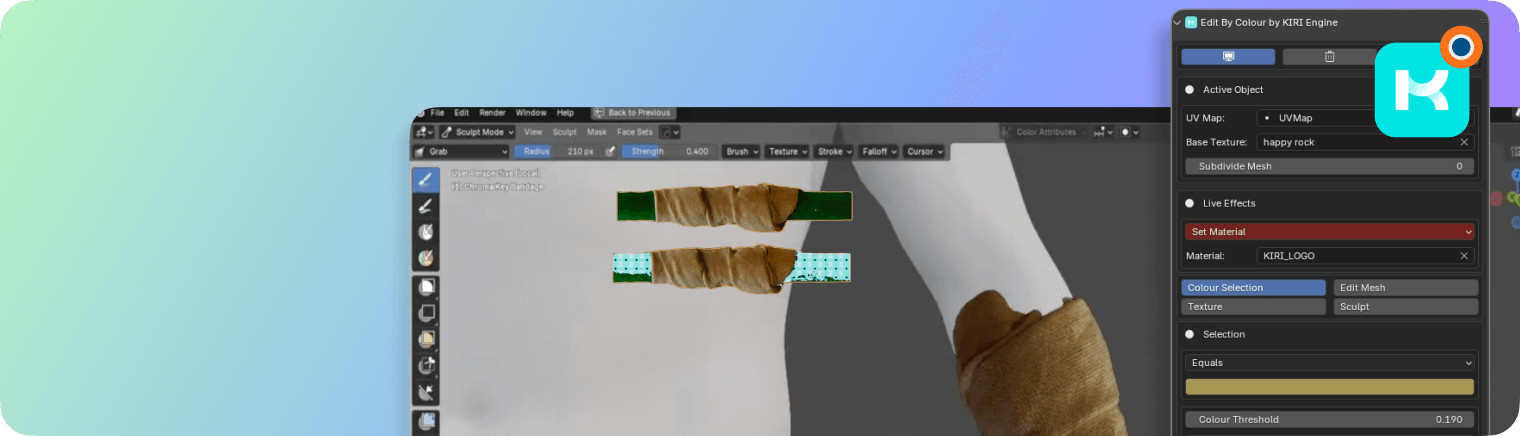
Edit By Colour by KIRI Engine
The Edit By Colour addon speeds up 3D scan editing in Blender with color-based mesh selection and manipulation, enabling faster baking, sculpting, retopology, and high-density mesh editing.

Download Edit By Colour Addon:


Please note: We are making these Blender addons available to you completely for free.:) If you like what we are doing, the best way to support us is to download KIRI Engine app on your phone and consider becoming a KIRI Engine Pro user
The Edit By Colour addon transforms the workflow of editing 3D scanned models in Blender by enabling color-based mesh selection and manipulation, similar to the color selection tools found in photo editing software. The addon lets users bake, sculpt, retopologize, and edit high-density meshes based on their color texture, speeding up the scan editing workflow.
"The Edit By Colour addon by KIRI Engine, brings photo editing's color selection tools to mesh editing in Blender. Make mesh selections by picking colors on your model. Use these selections to edit, bake, and retopologize with ease and speed"
1. What does the addon do?
The Colour Selection panel provides intuitive controls to precisely select mesh elements based on their texture colors, with adjustable tolerance and selection refinement options.
Live Effects, powered by Geometry Nodes, enables real-time deletion, smoothing, and material assignment while dynamically adjusting your color selection.
The Edit Mesh panel hosts essential editing operations that let you duplicate selected areas to new objects, split them from the current mesh, or simply convert them into Edit Mode selections.
For Sculpt mode, convert your colour selections into Face Sets for targeted sculpting and smoothing operations, making high-density scan editing more manageable, especially for beginners.
The Texture baking system allows you to create, replace, and rebake selected areas of your model's texture, perfect for removing unwanted details or surface imperfections.
Retopo Loops automatically generate clean quad topology around colour-selected areas to jump start your retopology workflow on scanned models.
2. Important Notes
Reading the full documentation is recommended. If you do not have time right now and want to get started immediately, you should at least check these points and the Quick Guide.
- Any model can be used providing the model has a colour texture and UV map. All colour selections are based on a selected colour texture using UV maps.
- The selection resolution will be relative to the face density of the model. Subdivisions can be increased from the addon.
- Red colours may be harder to select than other colours due to some Blender limitations. With patience and tweaking of the selection thresholds, the right selection can usually be achieved.
3. Quick Guide
- Import an object. Your object can be any mesh object with a colour texture.
- Select your object and from the addon press Add Edit By Colour Modifier.
- Specify the Base Texture used for colour selection
- The default colour selection is blue. And the default effect is Set Material. You will see any blue areas of your mesh replaced with a KIRI Logo material to visualise your selection.
- From Colour Selection menu, select a colour from your mesh. Use the selection settings to dial in the colour, masking, smooth the borders or remove small artifacts – full settings are covered in the Colour Selection part of this documentation.
- Once a selection has been made try changing the Live Effects to dynamically delete or smooth parts of the mesh. There are many more features that will be covered in their dedicated sections.

.png)
.png)
.png)
.png)
.png)
4. Installation
Important note:
The addon was made with Blender 4.2 – the addon may function with earlier versions of Blender – but full usability cannot be guaranteed. It is best to use the most recent version of Blender to guarantee full usability.
.png)
To install the addon make sure you have downloaded the .ZIP file (edit_by_colour_by_kiri_engine_version number).ZIP to your computer.
Drag and drop the .ZIP from a file browser into the Blender window.
An install dialogue will appear – press okay.
.png)
The addon can now be found in the 3d viewport. Pressing the 'N' key will bring up the N panel where you can find the addon.
.png)
5. Add Modifier
If the active object does not have the Edit By Colour modifier, one button will show.
.png)
Add Edit By Colour Modifier will add the required (Geometry Nodes) modifier to the active object.
Once the active object has the modifier, you will be shown the Active Object menu, to specify the textures used for colour selection.
.png)
6. Active Object
.png)
Settings for the active object are shown immediately after adding the modifier. You can set the objects UV Map name – which by default is set to the standard 'UVMap'
You must set the Base Texture for the addon to work and for the rest of the interface to be shown.
The resolution of your selection is based on face density. If you find the face density too low, you can add subdivisions from this menu with Subdivide Mesh.
7. Live Effects
Live Effects involve no addon code, they are produced entirely by the Geometry Node modifier and so, are entirely interactive. Choosing effects will cause parameters specific to that effect to be shown on the interface.
.png)
.png)
Set Material
This is the default effect immediately after adding the modifier since it is the easiest way to preview your current selection. By default, the material set will be the KIRI Logo material.
.png)
None
The modifier will have no effects. This can be useful if the effects of the modifier are making it hard to see parts of your mesh to select.
Delete Faces
Selected faces will be deleted.
.png)
Smooth
Selected faces can be smoothed using by turning up the Smooth Iterations. Raising these values to high can have the reverse effect instead of smoothing, so increase values slowly.
.png)
Smooth and Set Material
This combines the effects of Smooth and Set Material.
Retopo Loops
This is an advanced feature and will be covered fully in its own section. This allows the creation of quad topology loops around the current selection.
.png)
8. Colour Selection
.png)
This is the most import part of the addon as it affects all other functions.
.png)
You can choose if you want your selection to be colours Equal, Not Equal, Brighter Than or Darker Than the target colour.
.png)
By clicking the colour box an eye dropper can be shown and a colour selected from your mesh.
.png)
The colour selection can be fine-tuned using the Colour, Saturation and Value Thresholds.
The Filter Small Islands will remove selection islands by size. This can be useful to remove very small selection artifacts.
.png)
.png)
Grow / Shrink Selection will grow (if the number is positive) or shrink (if the number is negative) the current selection.
.png)
.png)
Masking allows you to specify a mask object to affect the selection.
You can choose for faces inside or outside the object to mask the current selection. If masking is enabled an extra button will be shown, allowing you to quickly add a wireframe cube object to specify as the mask object.
.png)
The selection edges will be representative of your model's topology. So rough topology makes for rough edges. The boundary of the selection can be smoothed with Smooth Boundary but pushing it too high can cause artifacts to appear.
.png)
.png)
9. Edit Mesh
.png)
The Edit Mesh panel hosts several common 'Edit Mode' features based on the colour selection. The selection can be duplicated to form a separate object, split from the current object or simply selected.
.png)
Important Note
Using the Edit Mesh effects requires applying and re-adding the Edit By Colour modifier (as stated in the window which pops up)
Meaning that any subdivisions created by the Subdivide Mesh feature in the Active Object menu can be applied destructively (made permanent) by checking Apply Subdivisions.
You can also specify if after the operation is complete you want the re-applied modifier's effects to be set to None, Set Material or No Change (same settings as before using the current function).
.png)
Select
Pressing this will enter edit mode and select the current colour selection.
.png)
Split
This will separate the currently selected faces from the object. They will be removed from the original object.
.png)
Duplicate
This will make a copy of the currently selected faces and create a new object. The original object will be kept intact.
.png)
10. Texture
.png)
The Texture panel is the most complex feature set – allowing the user to bake a small area of the object to a 'bake' patch.
This batch patch texture can then replace any selected areas and be re-baked with the original texture – allowing users to 'erase' mesh defects or distracting areas of an asset.
Create Material attributes will create a new attribute on the mesh, from the current colour selection. A material can be specified in the pop-up window. A new attribute node with the new attribute will be created in the assigned material.
.png)
This is great for creating shader masks.
.png)
The Patch Baking and Unify Textures functions are designed to be used sequentially from top to bottom.
.png)
Before using Add Bake Patch – place your 3D cursor somewhere on the mesh that has a uniform chunk of texture. An area that could be used to 'fill' gaps in the texture.
.png)
Add Bake Patch will let you choose the texture resolution you want to bake to, and then add a mesh plane at the 3D cursor location. The plane will have a shrink-wrap modifier applied, with your base mesh as the target.
Once added you can scale and move the plane to the best position. But moving too far from the original 3D cursor location may cause shrink-wrap issues.
.png)
Once the Bake Patch is in position you can use Bake To Patch to bake the original textures to the patch. The popup will let you check that you are baking from the correct object to the correct patch and material.
You can set the Bake Device if you do not have an adequate GPU.
The Bake Samples can be set, but the default 10 is usually sufficient.
You can Diffuse, Roughness and Normal passes, or selecting only some. If you select none there will be no changes after hitting OK.
.png)
After pressing ok, the status bar should notify you of the bakes progress.
To ensure the best bakes without error, wait until the bakes are complete before selecting or unselecting any objects.
.png)
You can complete the patch baking process by re-linking the new baked images in the Bake Patch Material with Link Baked Textures
.png)
.png)
If the bake is successful, it should look invisible on the base mesh.
With the patch baked you can now use the Bake Patch Material in the Set Material effects.
.png)
Since the UV scale of your original model and the bake patch will be different. You can change the Scale value in the Bake Patch Material to best suit your model.
.png)
We can now use the Unify Textures features to combine the original texture, and the Bake Patch texture into a single new texture.
.png)
Bake Combined Material will let us specify the same settings, resolution and passes as the Bake To Patch button. Again, after pressing ok, the status bar will notify you of the bakes progress.
Wait until the bakes are complete before selecting or unselecting any objects.
.png)
You can complete the unified baking process by replacing your old material and bake patch material, with the new Combined Material by pressing Switch To Baked Material.
.png)
.png)
You can now delete any leftover Bake Patches.
11. Sculpt
.png)
In Object Mode one button will appear – Selection To Face Sets. Pressing this will turn the colour selection into a Sculpting 'face set' and the mode will be changed from Object to Sculpt. The face sets will be visible as a separate colour from the rest of the mesh.
.png)
.png)
Once in sculpt mode the interface will change, and new options will be shown.
Auto Mask By Face Sets will make the current brush only affect a face set. Hover your mouse over a face set and click to begin sculpting. While the mouse is held down, moving the cursor outside of the face set will have no effect.
Face Set From Visible will set all currently visible areas of your mesh to the same face set. If your whole mesh is visible, it effectively clears all face sets.
.png)
Below these buttons some hot keys are shown. Hover your mouse over a face set area and press the hot keys to expand or shrink the face set area.
12. Retopo Loops
.png)
In many cases you may want to retopologise a scan or model manually. Forming loops around certain areas of a model is usually a good start for retopology.
Retopo Loops will create a loop of quad topology around a colour selection. This feature allows you to get a jump start on retopologising scans.
.png)
First the Live Effects must be set to Retopo Loops (the Retopo Loops effect is entirely Geometry Nodes based, and so are interactive like the other Live Effects)
The colour selection will have a 'loop' of quad faces drawn around its border.
.png)
You can preview the loops with or without the base mesh by toggling Preview With Base
The quad density can be controlled with Loop Resolution. Playing with this can also fix or create topology defects.
.png)
And the whole loop can be smoothed with Smooth Loops.
.png)
The width of the quad faces can be controlled with Loop Width.
.png)
The offset of the loop from the surface of the base mesh can be controlled with Surface Offset.
.png)
To make the loop topology fit the base mesh better. Enable Shrinkwrap.
If there are messy areas of colour selection, the loop may not be entirely clean. You can attempt to clean up the loop by previewing the curve that generates the loops with Preview Curve.
.png)
You can then delete any small curve strand defects with Remove Shorter Than:
Important Notes
The best method of cleaning up the loop, is often by adjusting the original colour selection.
Once you are happy with the loop's placement, you can Apply Loops.
.png)
.png)
You can choose if you want the modifier on the base object to be set to Set Material, Retopo Loops or None.
You can choose to Add Shrinkwrap and Subdiv – which will give the applied loops a subdivision surface modifier and a shrinkwrap modifier targeting the base object.
With several loops applied, you can quickly connect their edges by joining them as one object (Ctrl+J), selecting two edges and pressing 'f' to fill them.
13. Documentation / Tutorial Video
The Documentation button will launch a web browser, opening a page with the add-on's documentation
If you still need some extra help, the Tutorial Video button will launch a web browser, opening a page with a full extended tutorial video for the add-ons use.
14. See all Add-ons on Blender Market
If you are interested in using more of our add-ons, the See all Add-ons on Blender Market button will open a web browser for our addon marketplace.